将网站搭建国外VPS主机或者服务器上,有一个最不好的地方就是网站的速度。为了加快网站的打开速度,利用了各种一切可以用上的方法,例如将JS、CSS、图片等静态文件放在七牛云、又拍云、百度云CDN等,这在一定程度上可以加快网页的打开速度。
解决了静态文件访问加速的问题,重点就是解决服务器访问响应的速度了。首先,从硬件上加快网络访问速度,可以选择韩国VPS、美国CN2 GIA VPS、香港VPS等国内访问速度快的线路,土豪的话可以尝试Kdatacenter韩国VPS和腾讯云韩国VPS主机。
其次,就是优化VPS主机的响应速度了。同样的机房与线路,采取的服务器优化方式的差异可能会导致网站访问速度的巨大差别。本篇文章就是要分享WordPress缓存加速的方法,利用Cachify插件将WordPress页面缓存到Memcached,实现内存终极加速。
关于挖站否的博客建站以及服务器优化专题可以见:挖站否网站与服务器优化方法总结,更多的高效的服务器优化方法可参考:
- WordPress开启Nginx fastcgi_cache缓存加速方法-Nginx配置实例
- 网站优化加速-开启TLSV1.3和Brotli压缩-Oneinstack,LNMP,宝塔面板
- VPS主机加速方法 – 一键安装加速模块 从“软件”上提升VPS主机速度
PS:2019年11月13日更新,WordPress的反垃圾策略可以试试reCAPTCHA:反垃圾和作弊利器reCAPTCHA验证码服务-WordPress,WHMCS和Chevereto设置。
PS:2019年11月23日更新,WordPress还有一个经典的缓存插件,用户量巨大,效果也不错: 利用W3 Total Cache配置Memcached和Redis缓存 优化加速WP速度 。
一、服务器配置Memcached
Cachify插件:
- 下载:https://wordpress.org/plugins/cachify/
- 开源:https://github.com/pluginkollektiv/cachify/wiki
Cachify插件支持把静态内容缓存到 WordPress 数据库,硬盘,APC(PHP 缓存)或者 Memcached 中,缓存到数据库最为简单,但是一般建议缓存到Memcached,利用服务器内存存储和读取速度才是最快的。

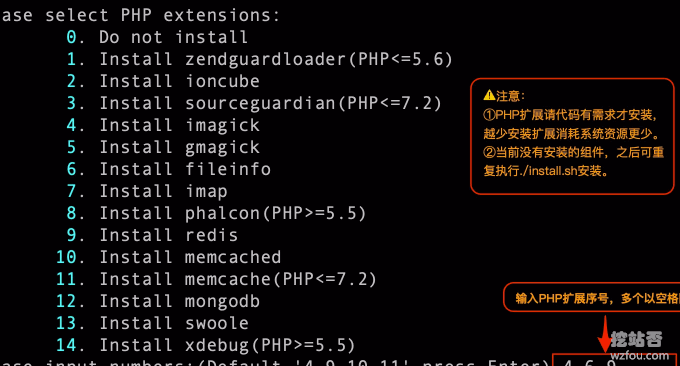
如果你的用的是Oneinstack或者LNMP一键包,或者是宝塔BT面板,直接使用脚本一键安装和配置Memcached,虚拟主机一般来说不支持Memcached,更多的服务器控制面板参考:服务器控制面板榜单。
二、Cachify插件安装启用
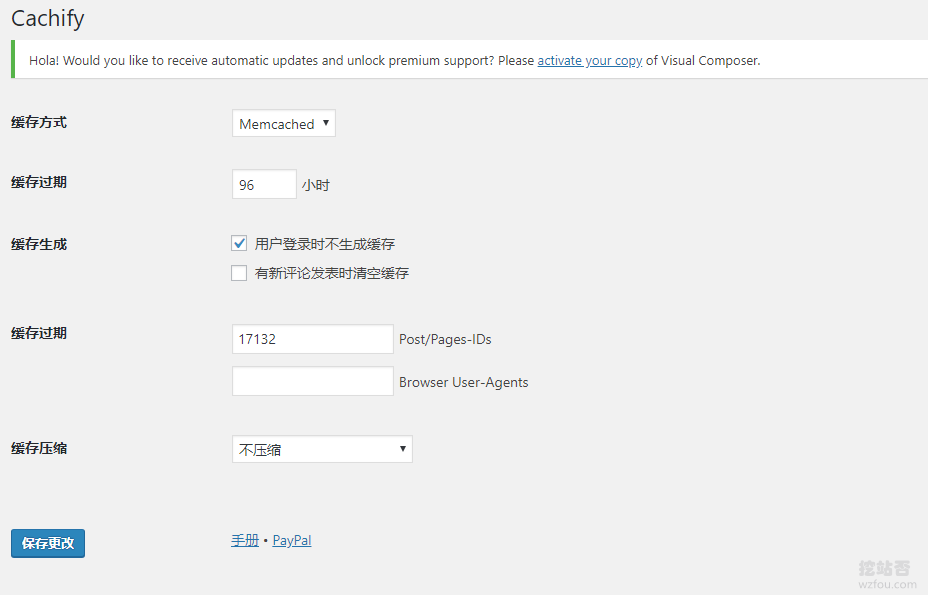
到Wordpress后台直接搜索Cachify插件即可安装,启用Cachify插件后界面如下图:(点击放大)
三、调用Cachify缓存加速
3.1 数据库
如果你在Cachify插件中选择了使用数据库Database作为你的页面缓存,无需其它的操作,直接保存后就可以使用了。

3.2 APC缓存
如果你使用APC缓存来调用Cachify,你需要按照下面的要求修改你的.htaccess或者是Nginx配置文件:
#.htaccess example (Apache):

<Files index.php>
    php_value auto_prepend_file /absolute path to/plugins/cachify/apc/proxy.php
</Files>

#Example for nginx instances:

location ~ .php {
    include fastcgi_params;
    fastcgi_pass 127.0.0.1:9000;
    fastcgi_param PHP_VALUE auto_prepend_file=/absolute path to/plugins/cachify/apc/proxy.php;

    location ~ /wp-admin/ {
        include fastcgi_params;
        fastcgi_pass 127.0.0.1:9000;
        fastcgi_param PHP_VALUE auto_prepend_file=;
    }
}
3.3 硬盘缓存
如果你是想让Cachify将缓存页面放在你的硬盘上,你需要按照下面的要求来修改你的.htaccess或者是Nginx配置文件:
#A description for only https and sites that are accessible via https and http follows below.
#Extension of the .htaccess (Apache), if the website is only accessible via http: (https://gist.github.com/sergejmueller/2027249#file-htaccess)
#.htaccess extension for websites that can be reached under both http and https: (https://gist.github.com/mcguffin/31f80070d631d56da23cefb4ef1b6649)

# BEGINN CACHIFY
<IfModule mod_rewrite.c>
    # ENGINE ON
    RewriteEngine On

    # GZIP FILE
    <IfModule mod_mime.c>
        RewriteCond %{REQUEST_URI} /$
        RewriteCond %{REQUEST_URI} !^/(wp-admin|wp-content/cache)/.*
        RewriteCond %{REQUEST_METHOD} !=POST
        RewriteCond %{QUERY_STRING} =""
        RewriteCond %{HTTP_COOKIE} !(wp-postpass|wordpress_logged_in|comment_author)_
        RewriteCond %{HTTP:Accept-Encoding} gzip
        RewriteCond %{DOCUMENT_ROOT}/path to/wp-content/cache/cachify/%{HTTP_HOST}%{REQUEST_URI}index.html.gz -f
        RewriteRule ^(.*) /path to/wp-content/cache/cachify/%{HTTP_HOST}%{REQUEST_URI}index.html.gz [L]

        AddType text/html .gz
        AddEncoding gzip .gz
    </IfModule>

    # HTML FILE
    RewriteCond %{REQUEST_URI} /$
    RewriteCond %{REQUEST_URI} !^/(wp-admin|wp-content/cache)/.*
    RewriteCond %{REQUEST_METHOD} !=POST
    RewriteCond %{QUERY_STRING} =""
    RewriteCond %{HTTP_COOKIE} !(wp-postpass|wordpress_logged_in|comment_author)_
    RewriteCond %{DOCUMENT_ROOT}/path to/wp-content/cache/cachify/%{HTTP_HOST}%{REQUEST_URI}index.html -f
    RewriteRule ^(.*) /path to/wp-content/cache/cachify/%{HTTP_HOST}%{REQUEST_URI}index.html [L]
</IfModule>
# END CACHIFY

#Nginx configuration file extension (https://gist.github.com/sergejmueller/1939164#file-gistfile1-nginxconf)

## GZIP
gzip_static on;

## CHARSET
charset utf-8;

## INDEX LOCATION
location / {
    if ( $query_string ) {
        return 405;
    }
    if ( $request_method = POST ) {
        return 405;
    }
    if ( $request_uri ~ /wp-admin/ ) {
        return 405;
    }
    if ( $http_cookie ~ (wp-postpass|wordpress_logged_in|comment_author)_ ) {
        return 405;
    }

    error_page 405 = @nocache;

    try_files /wp-content/cache/cachify/https-${host}${uri}index.html /wp-content/cache/cachify/${host}${uri}index.html @nocache;
}

## NOCACHE LOCATION
location @nocache {
    try_files $uri $uri/ /index.php?$args;
}

## PROTECT CACHE
location ~ /wp-content/cache {
    internal;
}
3.4 Memcached
如果你是想要使用Memcached来缓存你的页面,你需要按照下面的要求修改你的Nginx配置文件:(该模式仅支持Nginx)
#Extension of the Nginx configuration file (https://gist.github.com/sergejmueller/6113816#file-gistfile1-txt)
#If you have errors please try to change memcached_pass localhost:11211; to memcached_pass 127.0.0.1:11211; This forces IPv4 because some servers that allow ipv4 and ipv6 are configured to bind memcached to ipv4 only.

## GZIP
gzip_static on;

## CHARSET
charset utf-8;

## INDEX LOCATION
location / {
    error_page 404 405 = @nocache;

    if ( $query_string ) {
        return 405;
    }
    if ( $request_method = POST ) {
        return 405;
    }
    if ( $request_uri ~ "/wp-" ) {
        return 405;
    }
    if ( $http_cookie ~ (wp-postpass|wordpress_logged_in|comment_author)_ ) {
        return 405;
    }

    default_type text/html;
    add_header X-Powered-By Cachify;
    set $memcached_key $host$uri;
    memcached_pass localhost:11211;
}

location @nocache {
    try_files $uri $uri/ /index.php?$args;
}
该配置规则仅仅是官方给出的示例,你需要根据你自己的Nginx配置情况来适当调整,这里给出wzfou.com正在用的Nginx配置规则,仅供参考(本站采用Oneinstack架构):
#因oneinstack加载了Wordpress重写规则,故直接在wordpress.conf中修改
location / {

 #注释掉原有的重写规则
 #try_files $uri $uri/ /index.php?$args;

  #启用Cachify开始
   error_page 404 405 = @nocache;

    if ( $query_string ) {
        return 405;
    }
    if ( $request_method = POST ) {
        return 405;
    }
    if ( $request_uri ~ "/wp-" ) {
        return 405;
    }
    if ( $http_cookie ~ (wp-postpass|wordpress_logged_in|comment_author)_ ) {
        return 405;
    }

    default_type text/html;
    add_header X-Powered-By Cachify;
    set $memcached_key $host$uri;
    memcached_pass 127.0.0.1:11211;
   #启用Cachify结束

}


#启用Cachify开始
location @nocache {
    try_files $uri $uri/ /index.php?$args;
}
#启用Cachify结束

#以下为原配置规则,继续保留
rewrite /wp-admin$ $scheme://$host$uri/ permanent;
location ~* ^/wp-content/uploads/.*/.php$ {
  deny all;
}
我们还可以指定不缓存页面,例如我们可以增加对所有的移动设备用户不启用缓存,这个功能在全站使用了AMP时特别有用,规则如下:
#启用Cachify开始
charset utf-8;
#启用Cachify结束

location / {
 #try_files $uri $uri/ /index.php?$args;

 #启用Cachify开始
   error_page 404 405 = @nocache;

    if ( $query_string ) {
        return 405;
    }
    if ( $request_method = POST ) {
        return 405;
    }

	#移动端不缓存
	if ( $http_user_agent ~ "(MIDP)|(WAP)|(UP.Browser)|(Smartphone)|(Obigo)|(Mobile)|(AU.Browser)|(wxd.Mms)|(WxdB.Browser)|(CLDC)|(UP.Link)|(KM.Browser)|(UCWEB)|(SEMC-Browser)|(Mini)|(Symbian)|(Palm)|(Nokia)|(Panasonic)|(MOT-)|(SonyEricsson)|(NEC-)|(Alcatel)|(Ericsson)|(BENQ)|(BenQ)|(Amoisonic)|(Amoi-)|(Capitel)|(PHILIPS)|(SAMSUNG)|(Lenovo)|(Mitsu)|(Motorola)|(SHARP)|(WAPPER)|(LG-)|(LG/)|(EG900)|(CECT)|(Compal)|(kejian)|(Bird)|(BIRD)|(G900/V1.0)|(Arima)|(CTL)|(TDG)|(Daxian)|(DAXIAN)|(DBTEL)|(Eastcom)|(EASTCOM)|(PANTECH)|(Dopod)|(Haier)|(HAIER)|(KONKA)|(KEJIAN)|(LENOVO)|(Soutec)|(SOUTEC)|(SAGEM)|(SEC-)|(SED-)|(EMOL-)|(INNO55)|(ZTE)|(iPhone)|(Android)|(Windows CE)|(Wget)|(Java)|(curl)|(Opera)" )
    {
       return 405;
    }
	#移动端不缓存

    if ( $request_uri ~ "/wp-" ) {
        return 405;
    }
    if ( $http_cookie ~ (wp-postpass|wordpress_logged_in|comment_author)_ ) {
        return 405;
    }
    default_type text/html;
    add_header X-Powered-By Cachify;
    set $memcached_key $host$uri;
    memcached_pass 127.0.0.1:11211;
   #启用Cachify结束


}

#启用Cachify开始
location @nocache {
    try_files $uri $uri/ /index.php?$args;
}
#启用Cachify结束


rewrite /wp-admin$ $scheme://$host$uri/ permanent;
location ~* ^/wp-content/uploads/.*/.php$ {
  deny all;
}
四、Memcached缓存管理
4.1 更新缓存
Cachify插件允许你在更新一篇文章是清空所有的Memcached缓存,还是仅清空某页面的Memcached缓存。
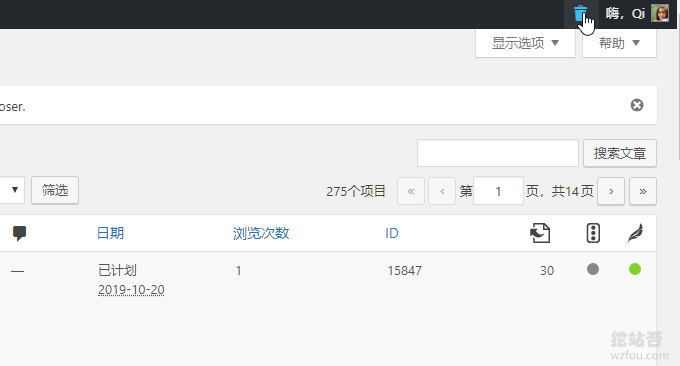
4.2 手动删除
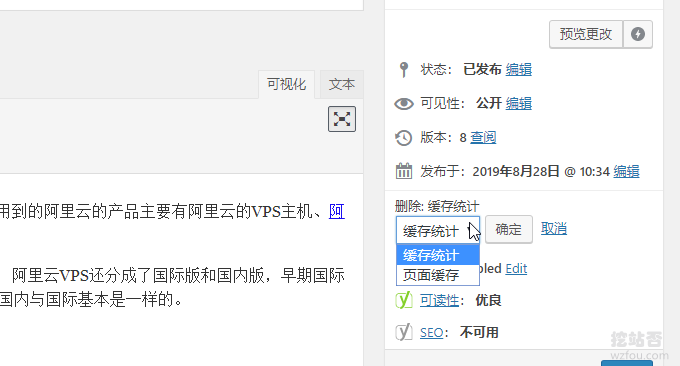
在Wordpress后台右上角可以手动一键删除Memcached缓存。
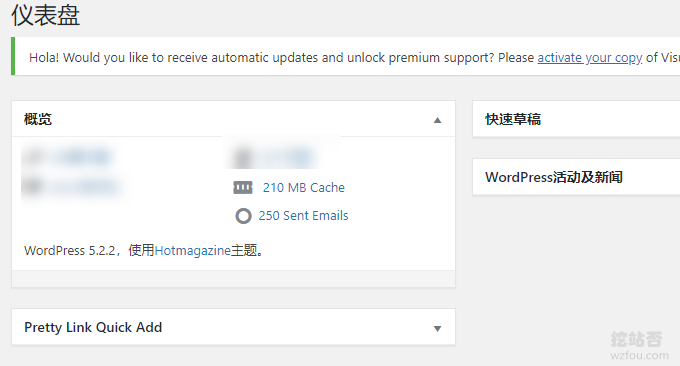
4.3 查看缓存
在Wordpress后台可以直接查看和更新Cachify插件缓存配置。
五、Cachify缓存加速效果
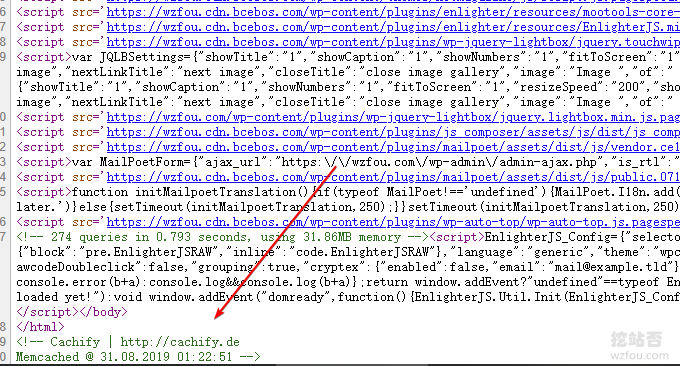
5.1 确认缓存生效
打开网页源代码,可以看到:<!-- Cachify | http://cachify.de Memcached @ 31.08.2019 01:22:51 -->等字样,表示该页面是由Cachify缓存生成的。
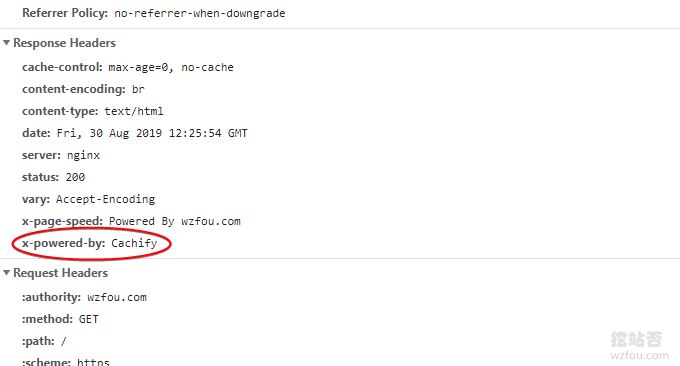
查看Response Headers,可以看到:x-powered-by: Cachify的字样,表示该页面是由Cachify缓存生成的。
5.2 加速效果明显
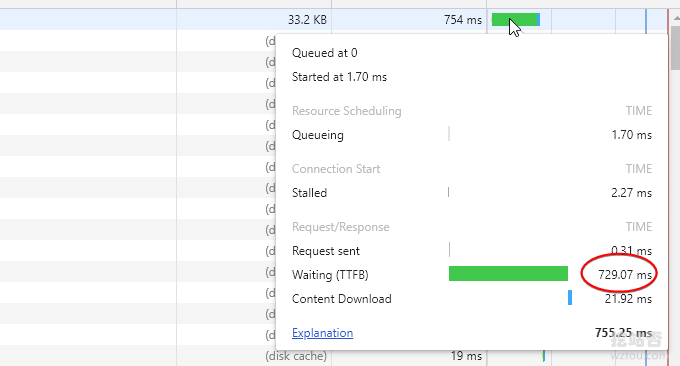
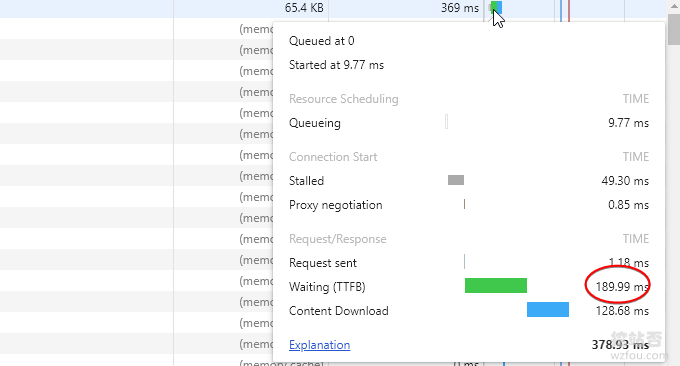
以wzfou.com首页作为测试,启用了Cachify Memcached缓存加速后,浏览器的TTFB时间大大缩短,这是未启用Cachify Memcached缓存加速时的TTFB时间,大约需要700ms以上。
这是启用了Cachify Memcached缓存加速时的TTFB时间,大约在190ms,与未启用Cachify Memcached缓存加速相比,时间缩短了一倍以上。
六、总结
为了达到Cachify插件最大化的Wordpress优化加速效果,建议使用Memcached缓存加速方式,它相对于使用数据库或者硬盘,直接在内存中写入和读取缓存,速度快了不少。
使用Cachify Memcached缓存加速最大的问题就是配置Nginx规则,你需要根据实际配置情况来调整。另外,Cachify插件支持忽略某个页面的缓存,有一些动态页面就非常有用了。
文章出自:挖站否 https://wzfou.com/cachify-memcached/,版权所有。本站文章除注明出处外,皆为作者原创文章,可自由引用,但请注明来源。













暂无评论内容